Install TensorFlow from source on Ubuntu 16.04 with GPU support
I suggest you do not install TensorFlow from source, because it could be a nightmare! I spent more than 10 hours to figure out all the bugs. If you have Ubuntu 16.04 installed on your computer, I suggest you to re-install a lower version, like 14.04, which has binary files ready to install. But if you just want to install it on Ubuntu 16.04 without any reason, like me, then you have to instal from source because Tensorflow binary support CUDA 7.5 only, while CUDA 7.5 doesn’t supported Ubuntu 16.04.
Prepare USB bootable stick
-
Download Ubuntu 16.04.1 LTS
-
Create a bootable USB stick following this tutorial .
Install Ubuntu 16.04
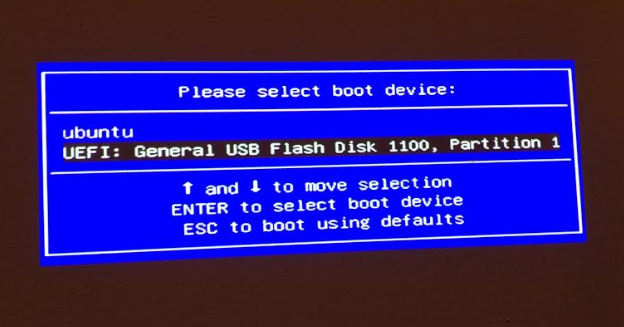
- Plug the USB stick on your computer, then restart your computer and press the F12 key to bring up the boot menu. Then choose to boot from the Ubuntu USB stick, and follow the instructions.
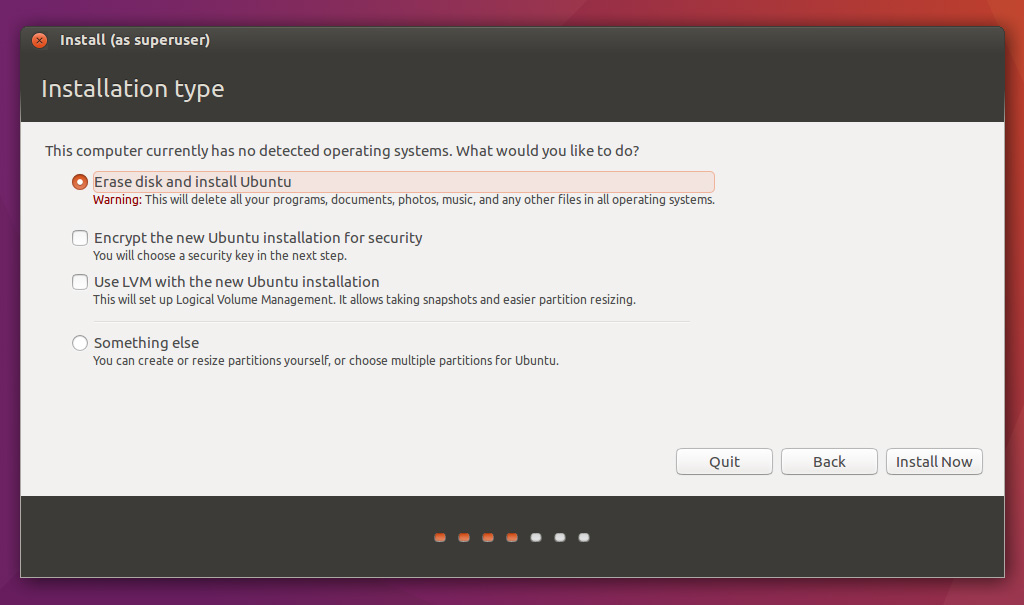
- The the install type dialog come up, choose “Erase disk and install Ubuntu”. Then follow the instruction to finish the installation and restart the computer.
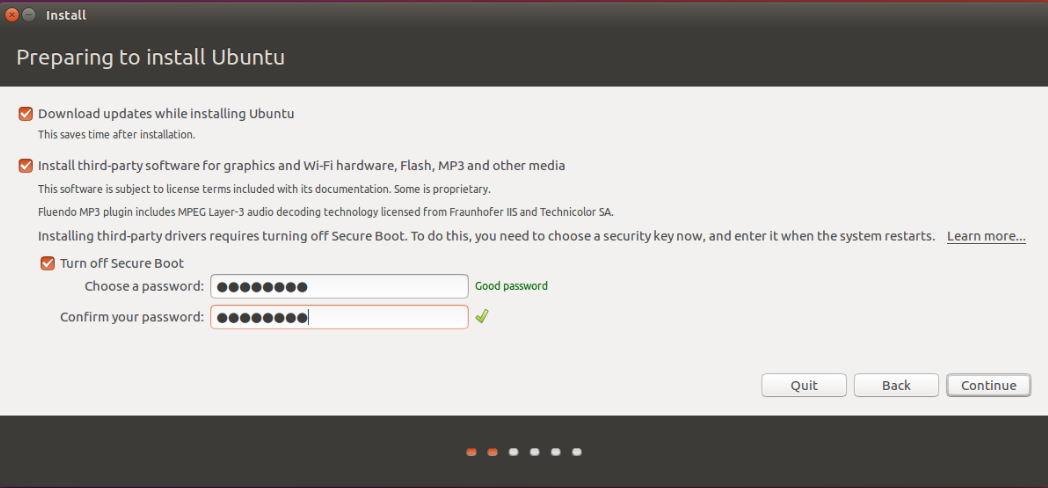
- Note the “Turn off Secure Boot” option. It said that: installing third party drivers requires truning off Secure Boot, which means when we install CUDA for NVIDIA graphic card, we need to turn off Secure Boot.
Install openssh-server to enable remote access using SSH.
sudo apt-get install -y openssh-server
I suggest you to remove all the empty folders under your home directory to make it clean, but it’s not mandatory.
cd; sudo rm -R *
Install CUDA and cuDNN.
- Copy the downloaded CUDA & cuDNN to your home directory. You can use Cyderduck (Mac) or WinSCP (Windows):
cuda_8.0.44_linux.run
cudnn-8.0-linux-x64-v5.1.tgz
- Turn off Secure Boot. To install CUDA (which belong to the third-party drivers) requires turning off Secure Boot.
The following command will ask you to create a password which will be asked to type when you try to turn off Secure Boot.
sudo mokutil --disable-validation
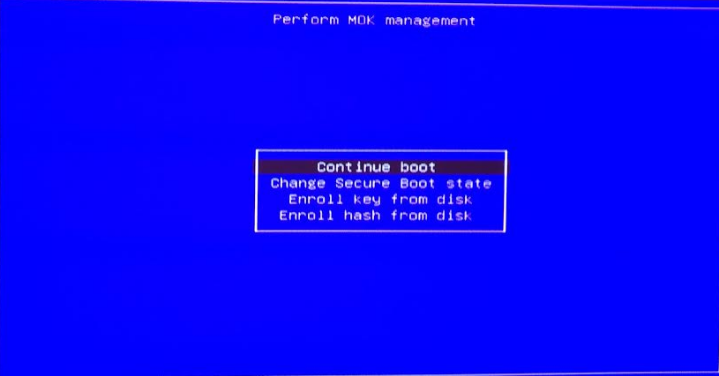
Restart the computer you will see the following menu, and select “Change Secure Boot State”
It’s a little fun when you were asked to type password. It looks like the following:
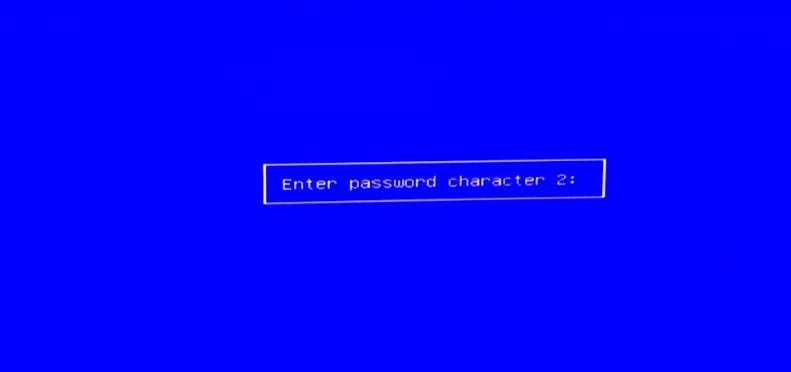
Which mean type the second character of your password, and press “Enter”. You will asked several times to type different password character.
- Stop X server. You may encounter the following error message if you install CUDA now:
Installing the NVIDIA display driver… It appears that an X server is running. Please exit X before installation. If you’re sure that X is not running, but are getting this >error, please delete any X lock files in /tmp.
To avoid this problem, the simplest method is:
- Access ubuntu from another computer using SSH
- Remove the screen (display device) of Ubuntu computer
- Reboot computer using sudo reboot, then access it again
- Instal CUDA & cuDNN. Now, you can instal CUDA using following command:
sudo sh cuda_8.0.44_linux.run
and install cuDNN:
tar xvzf cudnn-8.0-linux-x64-v5.1.tgz
sudo cp cuda/include/cudnn.h /usr/local/cuda/include
sudo cp cuda/lib64/libcudnn* /usr/local/cuda/lib64
sudo chmod a+r /usr/local/cuda/include/cudnn.h /usr/local/cuda/lib64/libcudnn*
Rerun above two blocks of codes can fix the bug with error message like “modprobe: FATAL: Module nvidia-uvm not found in directory /lib/modules/4.4.0-64-generic”, which generally happen when operation system updated to a new kernal.
Install tools using sudo apt-get install.
sudo apt-get install -y git python-pip python-dev python-numpy swig python-wheel default-jdk libcurl3-dev
Note: default-jdk in Ubuntu 16.04 means OpenJDK 8, which will be used to compile bazel form source.
Install Bazel:
- Download the source code of bazel form github.
cd; git clone https://github.com/bazelbuild/bazel.git
cd bazel;
- The master version may have some problem when build TensorFlow from source. I am not sure, but the following version works (ref):
git reset --hard 3e5ac9db
- Compile souce files into binary file:
./compile.sh
- Copy the binary bazel to a directory on the PATH, so we can use command bazel anywhere:
sudo cp output/bazel /usr/local/bin
Install TensorFlow
- Download source code
cd; git clone https://github.com/tensorflow/tensorflow
cd tensorflow;
- The lastest version may has problem, but the following version works(ref):
git reset --hard ec7f37e40fed
- Configure tensorflow for installation:
If encount Error downloading http://zlib.net/zlib-1.2.8.tar.gz, using this link to fix (replace http://zlib.net/zlib-1.2.8.tar.gz with http://bazel-mirror.storage.googleapis.com/zlib.net/zlib-1.2.8.tar.gz at the bottom).
./configure
- Local setting: if you got error message like:
locale.Error: unsupported locale setting
run the following command (ref):
export LANGUAGE=en_US.UTF-8
export LANG=en_US.UTF-8
export LC_ALL=en_US.UTF-8
or, edit the locale file: /etc/default/locale to:
LANGUAGE=en_US.UTF-8
LANG=en_US.UTF-8
LC_ALL=en_US.UTF-8
and then restart the computer.
- Now we can install safely:
bazel build -c opt --config=cuda //tensorflow/tools/pip_package:build_pip_package
bazel-bin/tensorflow/tools/pip_package/build_pip_package /tmp/tensorflow_pkg
sudo pip install /tmp/tensorflow_pkg/tensorflow-0.11.0rc1-py2-none-any.whl
Test installation with MNIST example:
- To avoid problem:
ImportError: libcudart.so.8.0: cannot open shared object file: No such file or directory
run the following command (ref):
export LD_LIBRARY_PATH=/usr/local/cuda/lib64
or permenantly save to system by adding LD_LIBRARY_PATH=/usr/local/cuda/lib64 into /etc/environment. (will work after restart the computer)
- Run MNIST example
cd tensorflow/models/image/mnist
python convolutional.py
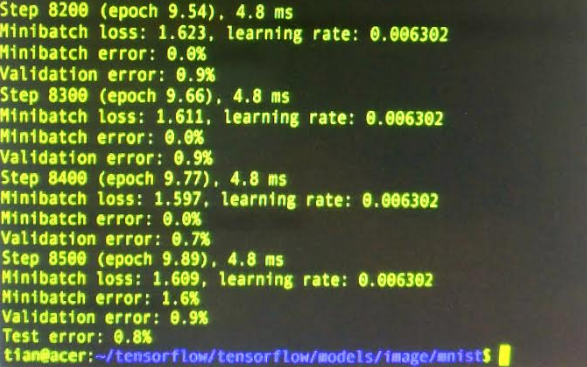
See, one iteration used only 4.8ms, and the whole process used 45 seconds, it’s fast!